OpenAPIで同じキーのパラメータを複数受け取る
OpenAPIで同じキーのパラメータを複数受け取りたい場合は collectionFormat: multi を使います。
collectionFormatDetermines the format of the array if type array is used. Possible values are:
csv - comma separated values foo,bar.
ssv - space separated values foo bar.
tsv - tab separated values
foo\tbar.pipes - pipe separated values foo|bar.
multi - corresponds to multiple parameter instances instead of multiple values for a single instance
foo=bar&foo=baz. This is valid only for parameters in “query” or “formData”.https://github.com/OAI/OpenAPI-Specification/blob/master/versions/2.0.md#parameterCollectionFormat
例えば、以下のように書くと、GETで /bar?foo=1&foo=2&foo=3 を受け取れるようになります。
/bar:
  get:
    parameters:
    - name: foo
      in: query
      type: integer
      collectionFormat: multi
GitHubのGit Data APIでコミットを作成する
本記事ではGitHub APIを利用してコミットを作成する方法を紹介します。通常はGitクライアントでcommitとpushを行うことでコミットを作成しますが、GitHub APIだけでもコミットを作成できます。
まずはGitのデータ構造を把握しておく必要があります。下図のように、GitではRef、Commit、Tree、Blobという単位でコミットやファイルが管理されています。
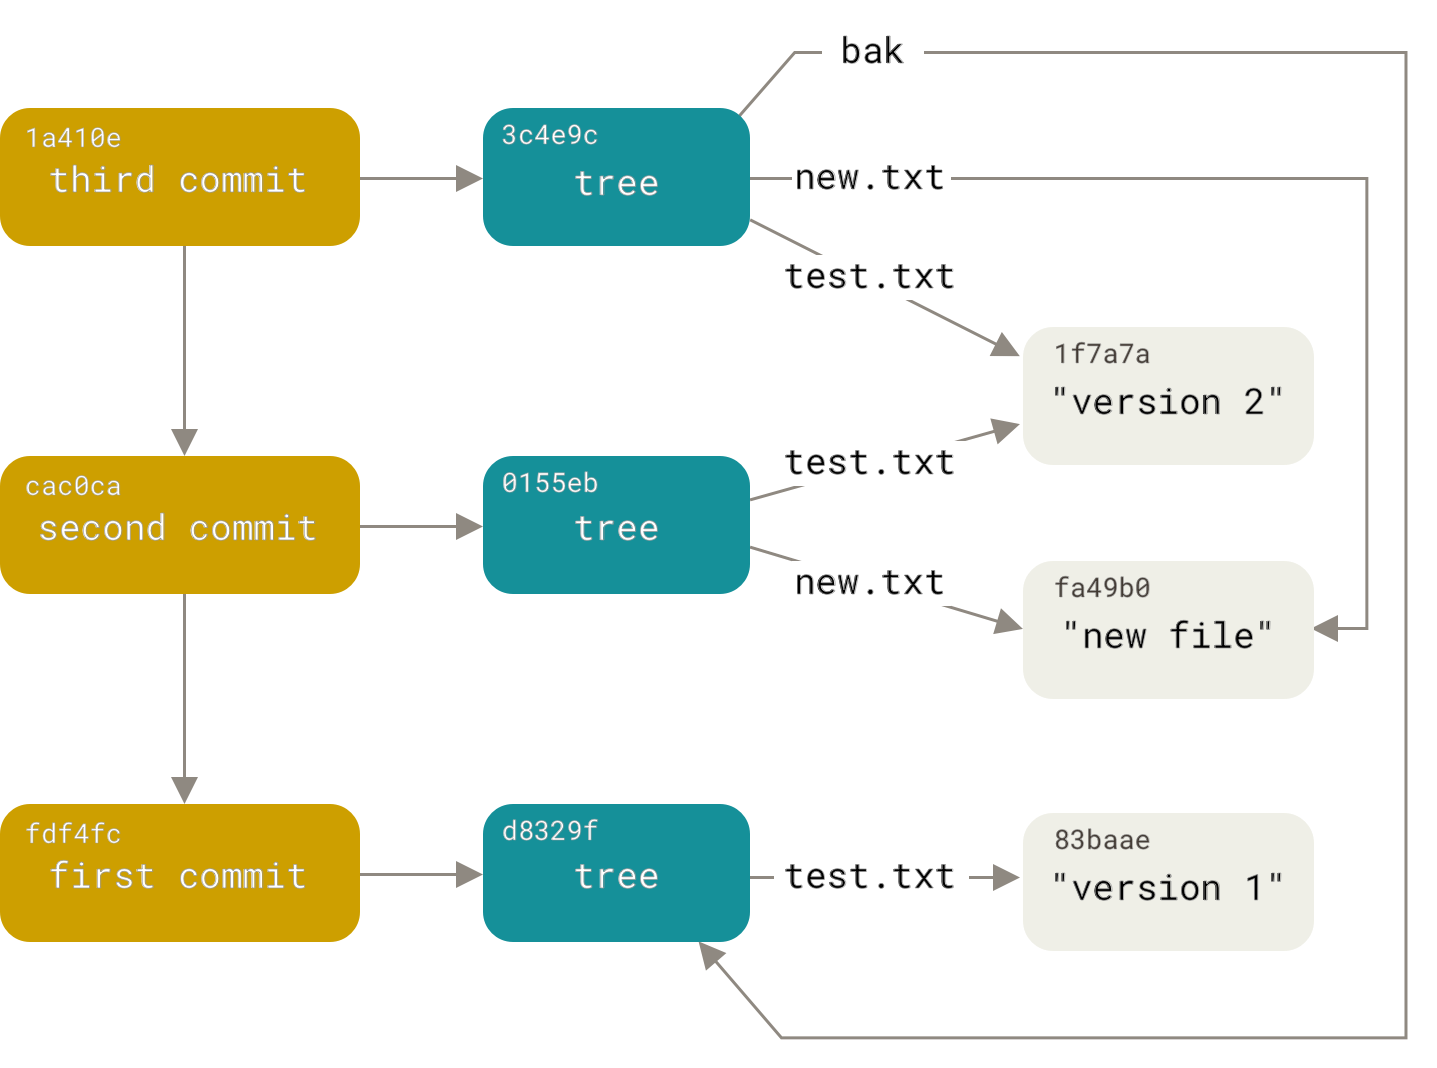
新しいコミットを作成するには、木構造のLeafからRootに向かって、すなわちBlob→Tree→Commit→Refの順でオブジェクトを作成していきます。
具体的には、以下の順序で操作を行います。
- Refを取得する。
- Commitを取得する。
- Blobを作成する。
- Treeを作成する。
- Commitを作成する。
- Refを更新する。
これらの操作はGit Data APIで実現できます。
Git Data | GitHub Developer Guide
それでは、順を追ってAPIを実行していきます。手元ではAdvanced REST Clientで動作確認しています。curlコマンドでも動くと思います。
1. Refの取得
親となるRefを取得します。ここではmasterブランチを取得します。ブランチの場合は先頭に heads/ を付けてリクエストを送ります。
https://developer.github.com/v3/git/refs/#get-a-reference
GET https://api.github.com/repos/int128/sandbox/git/refs/heads/master
200 OK
{
  "ref": "refs/heads/master",
  "url": "https://api.github.com/repos/int128/sandbox/git/refs/heads/master",
  "object": {
    "sha": "3fed286ca9b2908b22050734502858d0bf94546c",
    "type": "commit",
    "url": "https://api.github.com/repos/int128/sandbox/git/commits/3fed286ca9b2908b22050734502858d0bf94546c"
  }
}
2. Commitの取得
親となるCommitを取得します。先ほどのレスポンスで得たCommit SHAを指定します。
https://developer.github.com/v3/git/commits/#get-a-commit
GET https://api.github.com/repos/int128/sandbox/git/commits/3fed286ca9b2908b22050734502858d0bf94546c
200 OK
{
  "sha": "3fed286ca9b2908b22050734502858d0bf94546c",
  "url": "https://api.github.com/repos/int128/sandbox/git/commits/3fed286ca9b2908b22050734502858d0bf94546c",
  "html_url": "https://github.com/int128/sandbox/commit/3fed286ca9b2908b22050734502858d0bf94546c",
  "author": {
    "name": "Hidetake Iwata",
    "email": "int128@gmail.com",
    "date": "2016-10-04T12:14:40Z"
  },
  "committer": {
    "name": "GitHub",
    "email": "noreply@github.com",
    "date": "2016-10-04T12:14:40Z"
  },
  "tree": {
    "sha": "b54b2782d9ce34322073197eaf40c17d5f77e8a5",
    "url": "https://api.github.com/repos/int128/sandbox/git/trees/b54b2782d9ce34322073197eaf40c17d5f77e8a5"
  },
  "message": "Update README.md",
  "parents": [
    {
      "sha": "162d9db82836c66f2e283e14f3ea9ae75c893d94",
      "url": "https://api.github.com/repos/int128/sandbox/git/commits/162d9db82836c66f2e283e14f3ea9ae75c893d94",
      "html_url": "https://github.com/int128/sandbox/commit/162d9db82836c66f2e283e14f3ea9ae75c893d94"
    }
  ]
}
3. Blobの作成
ファイルの内容をアップロードしてBlobを作成します。Blob APIではBASE64でエンコードした文字列とUTF-8の文字列がサポートされています。バイナリを送りたい場合はBASE64を選択します。
https://developer.github.com/v3/git/blobs/#create-a-blob
POST https://api.github.com/repos/int128/sandbox/git/blobs
{
  "content": "VHVlLCBTZXAgIDUsIDIwMTcgIDM6MTQ6MzIgUE0K",
  "encoding": "base64"
}
201 Created
{
  "sha": "83bf64bec811a89102e03a5bc22095813ecff6a0",
  "url": "https://api.github.com/repos/int128/sandbox/git/blobs/83bf64bec811a89102e03a5bc22095813ecff6a0"
}
4. Treeの作成
Treeを作成します。先ほどのレスポンスで得たBlob SHAを指定します。base_treeには親となるTree SHAを指定します。
https://developer.github.com/v3/git/trees/#create-a-tree
POST https://api.github.com/repos/int128/sandbox/git/trees
{
  "base_tree": "b54b2782d9ce34322073197eaf40c17d5f77e8a5",
  "tree": [
    {
      "path": "file.rb",
      "mode": "100644",
      "type": "blob",
      "sha": "83bf64bec811a89102e03a5bc22095813ecff6a0"
    }
  ]
}
201 Created
{
  "sha": "705458d33828108c8bf4a03fc4f9c37cb60c55d1",
  "url": "https://api.github.com/repos/int128/sandbox/git/trees/705458d33828108c8bf4a03fc4f9c37cb60c55d1",
  "tree": [
    {
      "path": "LICENSE",
      "mode": "100644",
      "type": "blob",
      "sha": "8dada3edaf50dbc082c9a125058f25def75e625a",
      "size": 11357,
      "url": "https://api.github.com/repos/int128/sandbox/git/blobs/8dada3edaf50dbc082c9a125058f25def75e625a"
    },
    {
      "path": "README.md",
      "mode": "100644",
      "type": "blob",
      "sha": "68d31518867cdfe74d7917482e589c1a969ac8be",
      "size": 117,
      "url": "https://api.github.com/repos/int128/sandbox/git/blobs/68d31518867cdfe74d7917482e589c1a969ac8be"
    },
    {
      "path": "file.rb",
      "mode": "100644",
      "type": "blob",
      "sha": "83bf64bec811a89102e03a5bc22095813ecff6a0",
      "size": 30,
      "url": "https://api.github.com/repos/int128/sandbox/git/blobs/83bf64bec811a89102e03a5bc22095813ecff6a0"
    }
  ],
  "truncated": false
}
5. Commitの作成
Commitを作成します。先ほどのレスポンスで得たTree SHAを指定します。parents には親コミットを指定します。
https://developer.github.com/v3/git/commits/#create-a-commit
POST https://api.github.com/repos/int128/sandbox/git/commits
{
  "message": "Example Commit",
  "author": {
    "name": "Hidetake Iwata",
    "email": "int128@gmail.com",
    "date": "2017-09-02T12:14:40Z"
  },
  "parents": [
    "3fed286ca9b2908b22050734502858d0bf94546c"
  ],
  "tree": "705458d33828108c8bf4a03fc4f9c37cb60c55d1"
}
201 Created
{
  "sha": "c5f3cfb87748e7f71c2f35a275f6618e0da219fa",
  "url": "https://api.github.com/repos/int128/sandbox/git/commits/c5f3cfb87748e7f71c2f35a275f6618e0da219fa",
  "html_url": "https://github.com/int128/sandbox/commit/c5f3cfb87748e7f71c2f35a275f6618e0da219fa",
  "author": {
    "name": "Hidetake Iwata",
    "email": "int128@gmail.com",
    "date": "2017-09-02T12:14:40Z"
  },
  "committer": {
    "name": "Hidetake Iwata",
    "email": "int128@gmail.com",
    "date": "2017-09-02T12:14:40Z"
  },
  "tree": {
    "sha": "705458d33828108c8bf4a03fc4f9c37cb60c55d1",
    "url": "https://api.github.com/repos/int128/sandbox/git/trees/705458d33828108c8bf4a03fc4f9c37cb60c55d1"
  },
  "message": "Example Commit",
  "parents": [
    {
      "sha": "3fed286ca9b2908b22050734502858d0bf94546c",
      "url": "https://api.github.com/repos/int128/sandbox/git/commits/3fed286ca9b2908b22050734502858d0bf94546c",
      "html_url": "https://github.com/int128/sandbox/commit/3fed286ca9b2908b22050734502858d0bf94546c"
    }
  ]
}
6. Refの更新
masterブランチの指し先を更新します。先ほど作成したCommit SHAを指定します。
https://developer.github.com/v3/git/refs/#update-a-reference
PATCH https://api.github.com/repos/int128/sandbox/git/refs/heads/master
{
  "sha": "c5f3cfb87748e7f71c2f35a275f6618e0da219fa",
  "force": false
}
200 OK
{
  "ref": "refs/heads/master",
  "url": "https://api.github.com/repos/int128/sandbox/git/refs/heads/master",
  "object": {
    "sha": "c5f3cfb87748e7f71c2f35a275f6618e0da219fa",
    "type": "commit",
    "url": "https://api.github.com/repos/int128/sandbox/git/commits/c5f3cfb87748e7f71c2f35a275f6618e0da219fa"
  }
}
これでmasterブランチに新しいコミットが作成されました。
まとめ
GitHub APIで新しいコミットを作成するには以下を実行します。
- Refを取得する。
- Commitを取得する。
- Blobを作成する。
- Treeを作成する。
- Commitを作成する。
- Refを更新する。
プログラムからAPIを実行するのは大変なので、クライアントライブラリを利用しましょう。Javaの場合はEGitクライアントがGit Data APIをサポートしています。
Swagger Codegenにおけるカスタムバリデーションの追加
Swagger(OpenAPI)では必須チェック(required: true)や数値型チェック(type: integer)などが用意されており、コード生成時にバリデーションコードを出力できます。しかし、複雑なバリデーションルールを定義するには正規表現に頼らざるを得ないため、YAMLの保守性が悪化する問題を抱えています。そこで本稿では、Bean Validation Annotationのようなカスタムバリデータを用意し、コード生成時に適切なアノテーションを出力する方法を提案します。
Swaggerでは x- で始まる属性はVendor Extensionsと呼ばれており、APIやモデルを自由に拡張できるようになっています。ここではVendor Extensionsを利用してISBNコードのバリデーションを追加する例を考えます。
まず、Swagger YAMLに独自の属性を追加します。下記の例では x-validations 属性にバリデーションルールのマップを持たせています。
definitions:
  Pet:
    properties:
      code:
        type: string
        x-validations:
          isbn13: true
次に、Swagger CodegenのMustacheテンプレートをカスタマイズします。テンプレートの中では vendorExtensions プロパティでVendor Extensionsにアクセスできます。下記の例では独自のアノテーションを出力しています。
  {{#vendorExtensions.x-validations.isbn13}}
    @ISBN13
  {{/vendorExtensions.x-validations.isbn13}}
Spring MVCテンプレートの場合は、上記のコードを pojo.mustache に追加するとモデルに独自のアノテーションが付くようになります。コード生成を実行すると下記のようなモデルが出力されます。
public class Pet   {

  private Long id = null;


  private String name = null;

    @ISBN13
  private String code = null;
実際に動く例は下記のリポジトリを参照してください。