CloudForecastでL2スイッチのトラフィックを監視する
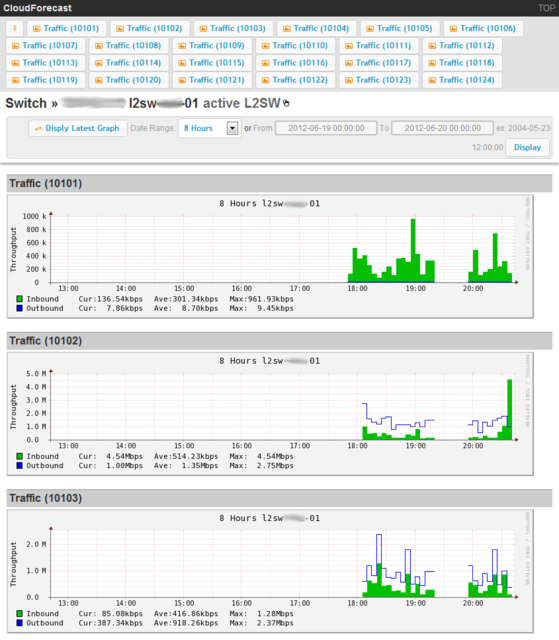
パフォーマンスの問題を調査するためにCloudForecastを使ってみることにしました。48ポートをざっくり眺めてみましょう。
CloudForecastの画面はこんな感じです。
ちょっと手狭ですね。Chromeのデベロッパーツールで即席でCSSをいじると、2列×12行に並べたりできますw
CloudForecastのインストール
L2スイッチの設定
Catalyst 2960Sを使っています。かなり適当ですがSNMP v3の場合はこんな感じです。
snmp-server group hoge v3 auth read v1default
snmp-server user cloudforecast hoge v3 auth sha ********
CloudForecastでSNMP v3を使う
SNMP v3では認証や暗号化を設定する必要があります。CloudForecastのSNMPコンポーネントに手を入れました。
diff --git a/lib/CloudForecast/Component/SNMP.pm b/lib/CloudForecast/Component/SNMP.pm
index 4dad24d..ea0625d 100644
--- a/lib/CloudForecast/Component/SNMP.pm
+++ b/lib/CloudForecast/Component/SNMP.pm
@@ -10,6 +10,10 @@ sub session {
         DestHost => $self->address,
         Community => $self->config->{community},
         Version => $self->config->{version},
+        SecLevel => $self->config->{level},
+        SecName => $self->config->{username},
+        AuthPass => $self->config->{password},
+        AuthProto => $self->config->{proto},
         Timeout => 1000000,
     );
     $self->{session};
今回は authNoPriv に必要な設定しか渡していませんが、同じようにキーを追加すれば他の方式に対応できます。SNMP::Session() の使い方は http://search.cpan.org/~hardaker/SNMP-5.0401/SNMP.pm に書いてあります。
CloudForecastの設定
cloudforecast.yaml でSNMPを設定します。
---
config:
# gearmanを利用する場合、enableを1にして、germandのhost名とportを指定します
  gearman_enable: 0
  gearman_server:
    host: localhost
    port: 7003
# rrdのファイルを設置する場所。「/」から始まると絶対パスとなります
  data_dir: data
# 監視項目の設定ファイルを設置するディレクトリ。「/」から始まると絶対パス
  host_config_dir: host_config

component_config:
# SNMPでデータを取得する時のオプション。communityとversion
  SNMP:
    version: 3
    level: authNoPriv
    proto: SHA
    username: ********
    password: ********
# MySQLを監視する場合のuser名とパスワード
  MySQL:
    user: root
    password: ********
server_list.yaml にL2スイッチのIPアドレスを書きます。
---
servers:
  - config: catalyst.yaml
    hosts:
      - 10.20.30.251 l2sw-01 active L2SW
      - 10.20.30.252 l2sw-02 backup L2SW
host_config/catalyst.yaml に監視項目を書きます。basic.yaml と同じように traffic で値が取れました。
---
component_config:
resources:
  - traffic:10101
  - traffic:10102
  - traffic:10103
  - traffic:10104
  - traffic:10105
  - traffic:10106
  - traffic:10107
  - traffic:10108
  - traffic:10109
  - traffic:10110
  - traffic:10111
  - traffic:10112
  - traffic:10113
  - traffic:10114
  - traffic:10115
  - traffic:10116
  - traffic:10117
  - traffic:10118
  - traffic:10119
  - traffic:10120
  - traffic:10121
  - traffic:10122
  - traffic:10123
  - traffic:10124
CloudForecastはいろいろ使い道がありそうですね。面白い。
