GitLab CI/CDでtfnotifyを使う
mercari/tfnotifyがv0.3.2でGitLab CI/CDに対応したので試してみました。個人的には待望の機能追加です。tfnotifyを利用すると、GitLab CI/CDでTerraformを実行した結果をMerge Requestのコメントに反映できます。いちいちジョブの結果を見に行かなくてよいので便利です。
Getting Started
以下のステップでGitLabとtfnotifyを設定します。
- Personal Access Tokenの設定
- tfnotifyの設定
- GitLab CI/CDの設定
1. Personal Access Tokenの設定
tfnotifyはGitLab APIを利用してCommitにコメントを書き込みます。tfnotifyがGitLab APIにアクセスできるように、環境変数でPersonal Access Tokenを渡します。
User Settingsを開き、新しいPersonal Access Tokenを生成します。スコープはapiのみでよいです。
リポジトリのCI/CD Settingsを開き、以下の環境変数を追加します。
2. tfnotifyの設定
.tfnotify.yaml を作成します。ここでは、tfnotifyのREADMEに記載されている設定例をそのまま利用します。
ci: gitlabci
notifier:
  gitlab:
    token: $GITLAB_TOKEN
    base_url: https://gitlab.example.com
    repository:
      owner: OWNER
      name: NAME
terraform:
  fmt:
    template: |
      {{ .Title }}

      {{ .Message }}

      {{ .Result }}

      {{ .Body }}
  plan:
    template: |
      {{ .Title }} <sup>[CI link]( {{ .Link }} )</sup>
      {{ .Message }}
      {{if .Result}}
      <pre><code> {{ .Result }}
      </pre></code>
      {{end}}
      <details><summary>Details (Click me)</summary>
      <pre><code> {{ .Body }}
      </pre></code></details>
  apply:
    template: |
      {{ .Title }}
      {{ .Message }}
      {{if .Result}}
      <pre><code> {{ .Result }}
      </pre></code>
      {{end}}
      <details><summary>Details (Click me)</summary>
      <pre><code> {{ .Body }}
      </pre></code></details>
https://gitlab.com を利用している場合は base_url は設定しなくてもOKです。OWNER, NAMEはリポジトリのパスに合わせて修正してください。
3. GitLab CI/CDの設定
terraformと同時にtfnotifyを実行するように .gitlab-ci.yml を書き換えます。planの例を下記に示します。
stages:
  - build

terraform_plan:
  stage: build
  image:
    name: hashicorp/terraform:0.12.8
    entrypoint:
      - /usr/bin/env
  script:
    # Install tfnotify
    - apk add --upgrade curl
    - curl -fL -o /tmp/tfnotify.tar.gz https://github.com/mercari/tfnotify/releases/download/v0.3.3/tfnotify_0.3.3_linux_amd64.tar.gz
    - tar -C /usr/bin -xzf /tmp/tfnotify.tar.gz
    # Run Terraform
    - cd terraform/
    - terraform --version
    - terraform init
    - terraform fmt | tfnotify fmt
    - terraform plan -out=plan.tfplan | tfnotify plan
  artifacts:
    name: plan
    paths:
      - terraform/plan.tfplan
  cache:
    paths:
      - terraform/.terraform
tfnotifyはGitHub Releasesのバイナリを利用します。hashicorp/terraform イメージにはcurlコマンドが含まれていないため、apkコマンドでcurlをインストールする必要があります。デフォルトではカレントディレクトリにある .tfnotify.yaml を読みに行くので、カレントディレクトリに注意してください。
動作確認
上記の変更をコミットし、新しいMerge Requestを作成します。うまくいけば、Merge Requestにコメントが書き込まれます。
Cluster AutoscalerをPrometheusでモニタリングする
Cluster Autoscalerを運用していると,ノード数が増減した契機を調査したいことがあります.Cluster Autoscalerは大量のログを出力するため,闇雲にログを追うのは大変です.PrometheusとGrafanaでCluster Autoscalerの動作を可視化しておくと調査しやすくなります.
Cluster Autoscalerにはメトリクスを取得するためのエンドポイントが用意されており,Prometheusと連携することが可能です.具体的なメトリクスはCluster Autoscalerのドキュメントを参照してください.
Prometheusで用意されているServiceMonitorというカスタムリソースを利用すると,監視対象のServiceとPrometheusを紐づけることが可能です.詳しくはPrometheusに関連するリソースの説明が参考になります.
本項では,以下の構成を用いて,Cluster AutoscalerをPrometheusでモニタリングする方法を説明します.
Prometheus (namespace: monitoring)
↓
Cluster Autoscaler ServiceMonitor (namespace: monitoring)
↓
Cluster Autoscaler Service (namespace: kube-system)
↓
Cluster Autoscaler Pod (namespace: kube-system)
Prometheusのセレクタの確認
PrometheusがServiceMonitorを検索する時のセレクタを確認します.
stable/prometheus-operatorチャートを利用する場合,以下の設定値でServiceMonitorの検索対象を指定できます.
prometheus.prometheusSpec.serviceMonitorNamespaceSelector- ServiceMonitorを検索する時のNamespaceを指定します.デフォルトではすべてのNamespaceを検索します.
prometheus.prometheusSpec.serviceMonitorSelector- ServiceMonitorを検索する時のセレクタを指定します.
prometheus.prometheusSpec.serviceMonitorSelectorNilUsesHelmValues- 前項の
serviceMonitorSelectorが未指定の場合,Helm releaseの値を利用します.
- 前項の
何も指定しない場合は以下のリソースが作成されます.
# kubectl -n monitoring get prometheuses.monitoring.coreos.com prometheus-operator-prometheus -oyaml
apiVersion: monitoring.coreos.com/v1
kind: Prometheus
spec:
  serviceMonitorNamespaceSelector: {}
  serviceMonitorSelector:
    matchLabels:
      release: prometheus-operator
すなわち,何も指定しない場合は release: prometheus-operator というラベルを持つServiceMonitorが検索されます.Cluster AutoscalerのServiceMonitorにこのラベルを付与すると,Prometheusが見つけてくれます.
Cluster Autoscalerのデプロイ
stable/cluster-autoscalerチャートをHelmfileでデプロイします.AWSの場合は以下の記事を参考にしてください.
stable/cluster-autoscalerチャートにはServiceMonitorリソースを作成するテンプレートが含まれています.helmfile.yamlのserviceMonitorを以下のように設定すると,ServiceMonitorリソースが作成されます.
releases:
  # https://github.com/helm/charts/tree/master/stable/cluster-autoscaler
  - name: cluster-autoscaler
    namespace: kube-system
    chart: stable/cluster-autoscaler
    values:
      - serviceMonitor:
          enabled: true
          namespace: monitoring
          selector:
            release: prometheus-operator
serviceMonitor.namespaceにはPrometheusのNamespaceを指定します.ServiceMonitorはPrometheusと同じNamespaceに存在する必要があります(詳しくはこちらを参照).
serviceMonitor.selectorには前項で調べたセレクタを指定します.
先ほどの設定を適用すると以下のリソースが作成されます.
# kubectl -n monitoring get servicemonitors.monitoring.coreos.com cluster-autoscaler-aws-cluster-autoscaler -oyaml
apiVersion: monitoring.coreos.com/v1
kind: ServiceMonitor
metadata:
  labels:
    prometheus: kube-prometheus
    release: prometheus-operator
  name: cluster-autoscaler-aws-cluster-autoscaler
  namespace: monitoring
前述のように,Cluster AutoscalerのServiceMonitorに release: prometheus-operator というラベルを付けておくことで,Prometheusが見つけてくれるようになります.
PrometheusとCluster Autoscalerの連携確認
ブラウザでPrometheusのService Discoveryを開きます.以下のようにCluster Autoscalerが認識されていれば成功です.
- monitoring/cluster-autoscaler-aws-cluster-autoscaler/0 (1/210 active targets)
もしService Discoveryに出てこない場合はセレクタの対応が合っているか確認します.以下のコマンドと睨めっこになると思います.
kubectl -n monitoring get prometheuses.monitoring.coreos.com
kubectl -n monitoring get servicemonitors.monitoring.coreos.com
Grafanaダッシュボードの追加
以下のダッシュボードを利用します.
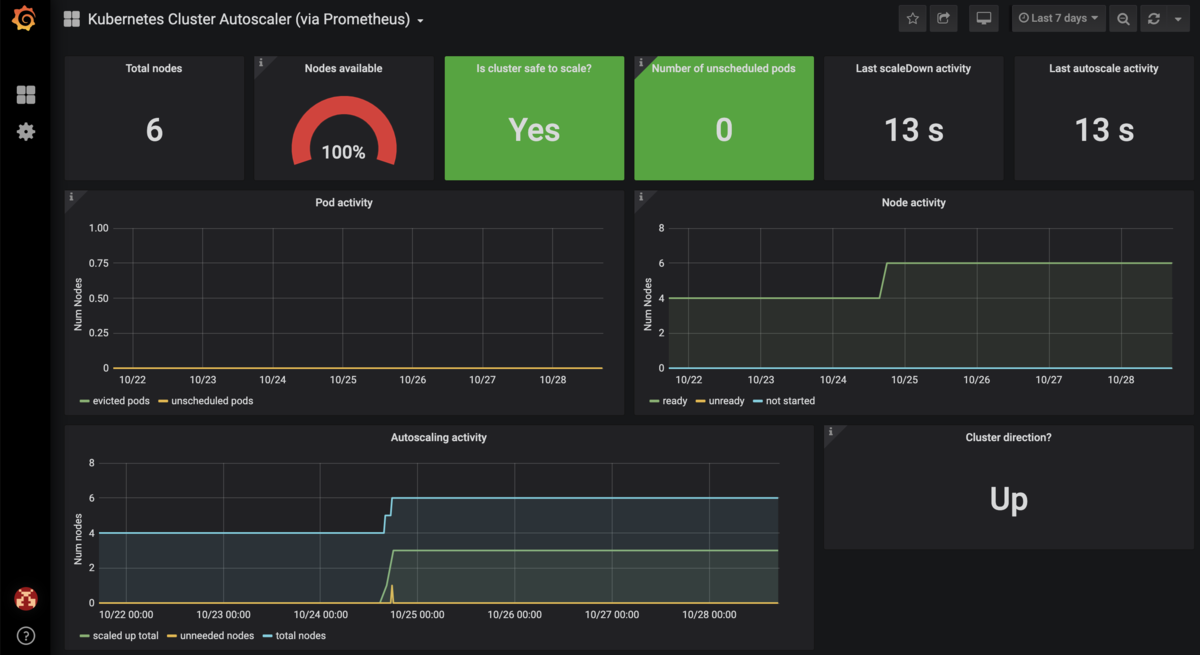
レビューコメントによると新しいバージョンのCluster Autoscalerでは動かない報告がありますが,私の環境では問題なく動いています.このダッシュボードを利用しているリポジトリもある(skyscrapers/charts)ので大丈夫かと思います.
参考までにスクリーンショットを貼っておきます.

ダッシュボードの動作確認が終わったら,ダッシュボードのJSONファイルをConfigMapに追加しておきましょう.GitOpsを利用すると,Gitリポジトリ上のConfigMapを更新したらGrafanaに反映されるので便利です.
apiVersion: v1
kind: ConfigMap
metadata:
  name: grafana-dashboard-cluster-autoscaler
  labels:
     grafana_dashboard: cluster-autoscaler
data:
  grafana-dashboard-cluster-autoscaler.json: |-
    {
      # 以下略
おすすめのダッシュボードがあったらぜひ教えてください!
ffmpegでmovをgifに変換する
QuickTimeで画面収録したmovファイルをgifファイルに変換する方法です。
Docker Hubの jrottenberg/ffmpeg イメージを利用します。以下を実行すると、サイズやフレームレートをそのままにしてファイルを変換します。
docker run --rm -v $PWD:/src jrottenberg/ffmpeg:4.1-alpine -y -i /src/example.mov /src/example.gif
いつも忘れるのでメモ。