Kubernetes nodesをMulti-AZからSingle-AZに移行した
kopsで運用しているKubernetes nodesをMulti-AZからSingle-AZに移行したので作業メモを残しておきます。
us-west-2b や us-west-2c にあるNodesとPersistent Volumesを us-west-2a に移行します。Masterは us-west-2a のままにします。
kops 1.8.0, Kubernetes 1.8.4で確認しています。
Nodesの移行
kops
NodesのAvailability Zoneを us-west-2a,us-west-2b,us-west-2c から us-west-2a のみに変更します。
% kops get ig
Using cluster from kubectl context: kops.hidetake.org

NAME            ROLE    MACHINETYPE MIN MAX ZONES
master-us-west-2a   Master  t2.micro    1   1   us-west-2a
nodes           Node    t2.micro    2   2   us-west-2a,us-west-2b,us-west-2c

% kops edit ig nodes
Using cluster from kubectl context: kops.hidetake.org

% kops get ig
Using cluster from kubectl context: kops.hidetake.org

NAME            ROLE    MACHINETYPE MIN MAX ZONES
master-us-west-2a   Master  t2.micro    1   1   us-west-2a
nodes           Node    t2.micro    2   2   us-west-2a
Clusterのサブネットも us-west-2a,us-west-2b,us-west-2c から us-west-2a のみに変更します。
% kops edit cluster
変更内容を適用します。
% kops update cluster
Using cluster from kubectl context: kops.hidetake.org

I1228 10:58:37.403838   77384 executor.go:91] Tasks: 0 done / 73 total; 31 can run
I1228 10:58:38.933794   77384 executor.go:91] Tasks: 31 done / 73 total; 24 can run
I1228 10:58:40.071632   77384 executor.go:91] Tasks: 55 done / 73 total; 16 can run
I1228 10:58:41.554352   77384 executor.go:91] Tasks: 71 done / 73 total; 2 can run
I1228 10:58:41.711652   77384 executor.go:91] Tasks: 73 done / 73 total; 0 can run
Will modify resources:
  AutoscalingGroup/nodes.kops.hidetake.org
    Subnets                  [id:subnet-67dc353d, id:subnet-2daa9a4b, id:subnet-5210431a] -> [name:us-west-2a.kops.hidetake.org id:subnet-5210431a]

Must specify --yes to apply changes

% kops update cluster --yes
Using cluster from kubectl context: kops.hidetake.org

I1228 10:58:54.651294   77386 executor.go:91] Tasks: 0 done / 73 total; 31 can run
I1228 10:58:56.218052   77386 executor.go:91] Tasks: 31 done / 73 total; 24 can run
I1228 10:58:57.354869   77386 executor.go:91] Tasks: 55 done / 73 total; 16 can run
I1228 10:58:58.727423   77386 executor.go:91] Tasks: 71 done / 73 total; 2 can run
I1228 10:58:59.248501   77386 executor.go:91] Tasks: 73 done / 73 total; 0 can run
I1228 10:58:59.248636   77386 dns.go:153] Pre-creating DNS records
I1228 10:59:00.687645   77386 update_cluster.go:248] Exporting kubecfg for cluster
kops has set your kubectl context to kops.hidetake.org

Cluster changes have been applied to the cloud.


Changes may require instances to restart: kops rolling-update cluster

% kops rolling-update cluster
Using cluster from kubectl context: kops.hidetake.org

NAME            STATUS  NEEDUPDATE  READY   MIN MAX NODES
master-us-west-2a   Ready   0       1   1   1   1
nodes           Ready   0       4   2   2   4

No rolling-update required.
上記を実行するとAuto Scaling Groupの設定が変更されます。
AWS management console
EC2インスタンスの一覧を見ていると、Nodesが以下のように変化することが分かります。
- us-west-2a で新しいnodeが起動する。
- us-west-2a で新しいnodeが起動する。
- us-west-2b にある既存のnodeがterminateする。
- us-west-2c にある既存のnodeがterminateする。
すべて終わるまで10分ぐらいかかりました。
Kubernetes Dashboard
Podsが以下のように変化することが分かります。
Persistent Volumesの移行
すべてのNodesが us-west-2a に移行したため、us-west-2b や us-west-2c に存在するPersistent Volumes(EBS)に依存するPodを実行しようとすると、以下のエラーが発生します。
No nodes are available that match all of the predicates: NoVolumeZoneConflict (3), PodToleratesNodeTaints (1).
動的に確保された(Dynamically provisioned)Persistent Volumesを移行するには細心の注意が必要です。移行に先立って、あらかじめ以下の関係を書き出しておきます。
- Deployment
- Persistent Volume Claim
- Persistent Volume
- EBS Volume
Persistent Volumesを別のAZに移行するには以下の手順が必要です。
- Persistent Volumeの
persistentVolumeReclaimPolicyをRetainに変更する。これはPersistent Volume Claimを削除した時にEBS Volumeも一緒に削除されるのを防ぐため。 - Persistent Volumeに依存するPersistent Volume ClaimとDeploymentを削除する。
- Persistent Volumeのステータスが Released になったことを確認する。
- EBS Volumeのステータスが available になったことを確認する。
- 旧AZのEBS VolumeからSnapshotを作成する。
- Snapshotから新AZでEBS Volumeを作成する。
- Persistent Volumeの以下の属性を変更する。この時点では新しいEBS Volumeはアタッチされない。
failure-domain.beta.kubernetes:新しいAZ(例:us-west-2a)volume-id:新しいEBS Volume(例:aws://us-west-2a/vol-0123456789)
- Persistent Volume Claimを再作成する。Persistent Volumeを紐付けるため、以下の属性を指定しておく。
volumeName:Persistent Volumeの名前(例:pvc-1801704a-eb70-11e7-a258-060098a4bc1c)
- Persistent Volumeの以下の属性を変更する。逆方向の紐付けも直さないと正しくアタッチされない。
claimRef: uid:Persistent Volume ClaimのuidclaimRef: resourceVersion:Persistent Volume ClaimのresourceVersion
- Persistent Volumeのステータスが Bound になったことを確認する。
- EBS Volumeのステータスが in-use になったことを確認する。
順を追ってコマンドを説明します。
Persistent Volumeの紐付け解除とPersistent Volume Claimの削除
# Persistent Volumeの `persistentVolumeReclaimPolicy` を `Retain` に変更
kubectl edit pv

# Persistent Volumeに依存するPersistent Volume ClaimとDeploymentを削除
kubectl delete pvc/example deployment/example

# Persistent Volumeのステータスが Released になったことを確認
kubectl get pv
EBS VolumeのAZ移行
# 旧Volumeの確認(Nameの確認)
aws ec2 describe-volumes

# 旧AZのEBS VolumeからSnapshotを作成
aws ec2 create-snapshot --volume-id vol-0123456789 --description kops.example.com-dynamic-pvc-1801704a-eb70-11e7-a258-060098a4bc1c
タグは移行しなくても問題ないようですが、後から何のVolumeか分からなくなると辛いので、タグもそのまま移行することをおすすめします。
# 旧Volumeの確認(Tagsの確認)
aws ec2 describe-volumes

# 新Volumeの作成
aws ec2 create-volume --snapshot-id snap-0123456789 --availability-zone us-west-2a --volume-type gp2 --size 10 --tag-specifications '[{"ResourceType": "volume", "Tags": [上記でダンプした旧ボリュームのTags]}]'
Persistent Volumeの再紐付け
# Persistent Volumeの属性を変更
kubectl edit pv

# Persistent Volume Claimを再作成(volumeName指定)
vim example.yaml
kubectl apply -f example.yaml

# Persistent Volumeの属性を変更
kubectl edit pv

# Persistent Volumeのステータスが Bound になったことを確認
kubectl get pv
まとめ
- NodesのAZ移行は
kopsで簡単にできる。 - Persistent VolumesのAZ移行は辛い。特に、dynamically provisionedのものは関連を壊さないように細心の注意が必要になる。

- 作者: Kelsey Hightower,Brendan Burns,Joe Beda,松浦隼人
- 出版社/メーカー: オライリージャパン
- 発売日: 2018/03/22
- メディア: 単行本(ソフトカバー)
- この商品を含むブログを見る
インターネットとVPC内部から同一FQDNでアクセス可能な構成
AWSでALBを使う場合に、Security Groupでインターネットからアクセス可能なIPアドレスを制限しながら、VPC内部から同じFQDNでサービスにアクセスできるようにしたい。
TL;DR
Requirements:
- インターネットから
https://api.example.comでサービスにアクセスできること - EC2から
https://api.example.comでサービスにアクセスできること - インターネット側はSecurity Groupでアクセスを制限する
Solution:
Internet
↓
Route53 Public Hosted Zone
↓
Internet Gateway
↓
Security Group (internet-facing)
↓
ALB (internet-facing)
↓
EC2
VPC ENI
↓
Route53 Private Hosted Zone
↓
Security Group (internal)
↓
ALB (internal)
↓
EC2
VPC内部からALBへの通信
EC2からinternet-facing ALBにリクエストを送ると、EC2に紐付いたPublic IPアドレスが送信元になります。ALBにアクセス可能なIPアドレスを制限する場合、内側からアクセス可能にするにはEC2のPublic IPアドレスも追加する必要があります。もちろん、EC2同士がPrivate IPアドレスで通信すれば問題ないのですが、Auto Scaling Groupを利用している場合はIPアドレスが変わってしまうため困難です。
EC2
↓
Security Group
↓
ALB (internet-facing)
↓
Auto Scaling Group
↓
EC2
下記のような場合、VPCの内側からALBへの通信が必要になります。
- 開発ツールの設定にGitリポジトリのURLを書いており、外側からも内側からも同じURLでGitリポジトリにアクセスしたい。
- OAuth2やOpenID Connectを使っており、ブラウザから見えるURLと同じFQDNで authorization code を取得できる必要がある。
- VPC LambdaからALBにアクセスしたい。
もともとは内製のツールでAuto Scaling Group配下のEIPを固定し、Security GroupにEIPを入れる方式を採用していましたが、 id:mumoshu さんに別の解決法があるよと教えていただきました。
Private Hosted Zoneとinternal ALBによる解決法
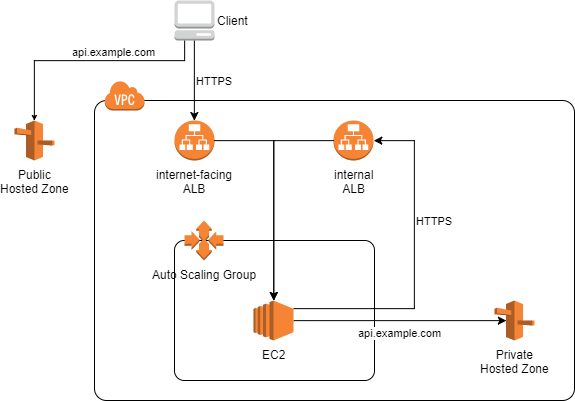
VPC内部からALBへの通信を実現するため、別のルートを作る方法があります。具体的には、VPCの内側からサービスにアクセスするためのinternal ALBと、internal ALBを返すPrivate Hosted Zoneを作成します。
EC2
↓
Route53 Private Hosted Zone
↓
Security Group
↓
ALB (internal)
↓
Auto Scaling Group
↓
EC2
例えば、IPアドレス制限付きで https://api.example.com で公開しているサービスがあるとします。
VPCの内側から同じURLでサービスにアクセスできるようにするには下記を行います。
- internal ALBを作成します。この時、EC2のSecurity Groupをソースに設定し、EC2からALBへの通信を許可しておきます。
- Route53で
example.comのPrivate Hosted Zoneを作成します。 - Aレコードを作成して
api.example.comをinternal ALBに割り当てます。
最終的な構成を下図に示します。

まとめ
Inbound Ruleに設定するソースをPublic IPじゃなくてSGにする、じゃダメな感じですか?(インスタンスからALBへの通信がインターネット経由の通信になるからPublic IPじゃないとだめとか?
— Yusuke KUOKA (@mumoshu) 2017年12月20日
あら!ちなみに、ALBをinternet-facingではなく、internalにしたらいけると思うのですが、それもダメな感じですか?(ALBはいじっちゃいけない、とかなければ
— Yusuke KUOKA (@mumoshu) 2017年12月20日
できないです!でもその場合、インターネットからアクセスする用と、VPC内からアクセスする用のALBを分けたくなります。Hosted ZoneもそれぞれPublicとPrivateで分けて。
— Yusuke KUOKA (@mumoshu) 2017年12月20日
はい、そうです!
— Yusuke KUOKA (@mumoshu) 2017年12月20日
KeycloakのSAML SSOでGitLabやMattermostにログインする
KeycloakとGitLabでSAML SSOを設定する方法を説明します。ユーザ管理をKeycloakで行いながら、GitLabやMattermostにSSOできるのでとても便利です。
TL;DR
- Keycloakはオープンソースの統合ID管理ツールです。OpenID ConnectやSAMLによる認証を提供しています。(こちらの記事が参考になります)
- GitLabはオープンソースのソースコード管理ツールです。OmniAuth IntegrationでソーシャルアカウントやSAMLによるSSOに対応しています。
- KeycloakとGitLabの連携にはSAMLを利用します。
Keycloakの設定
Keycloakで新しいClientを追加します。認証連携したいユーザがいるRealmで作業してください。
- Client ID:
https://gitlab.example.com*1 - Client Protocol:
saml - Client Signature Required: OFF
- Root URL:
https://gitlab.example.com - Valid Redirect URIs:
https://gitlab.example.com/*
それから属性のマッピングを設定します。
| SAML属性名 | Keycloakのユーザプロパティ |
|---|---|
email |
email |
first_name |
firstName |
last_name |
lastName |
username |
username |
SAML OmniAuth Providerの説明 によると groups 属性が含まれていたらGitLabグループとして認識されるようですが、ユーザを自動的にグループに追加してくれるわけではないので、あまり役に立たなさそうです。
デフォルトではRealmに存在するすべてのユーザがGitLabでログインできます。
Clientを作成したら、IdPの証明書を取得しておきます。InstallationタブでSAML Metadata IDPSSODescriptorを選択するとXMLが表示されるので、<dsig:X509Certificate> 要素に入っているBASE64文字列をメモしておきます。
なお、Clientの設定にあたっては下記が参考になります。
GitLabの設定
/etc/gitlab/gitlab.rb でOmniAuthを設定します。DockerやKubernetesを利用している場合は GITLAB_OMNIBUS_CONFIG 環境変数で設定します。
gitlab_rails['omniauth_enabled'] = true
gitlab_rails['omniauth_allow_single_sign_on'] = ['saml']
gitlab_rails['omniauth_block_auto_created_users'] = false
gitlab_rails['omniauth_auto_link_saml_user'] = true
gitlab_rails['omniauth_providers'] = [
  {
    name: 'saml',
    label: 'EXAMPLE LOGIN',  # ログインボタンのラベル。日本語は利用できないようです
    args: {
      assertion_consumer_service_url: 'https://gitlab.example.com/users/auth/saml/callback',
      idp_cert: '-----BEGIN CERTIFICATE-----
MII****
-----END CERTIFICATE-----',  # Keycloakで取得した証明書
      idp_sso_target_url: 'https://keycloak.example.com/auth/realms/YOUR_REALM/protocol/saml',
      issuer: 'https://gitlab.example.com',
      name_identifier_format: 'urn:oasis:names:tc:SAML:2.0:nameid-format:persistent',
      attribute_statements: { username: ['username'] }  # GitLabのユーザ名で使う属性を指定 (optional)
    }
  }
]
上記の gitlab.example.com や keycloak.example.com は実際のドメイン名に置き換えてください。また、IdPの証明書はKeycloakで取得したものを入れます。
デフォルトではメールアドレスの @ より前がGitLabのユーザ名になりますが、 attribute_statements を設定すると任意のSAML属性をユーザ名に指定できます(Use different SAML claim to set username? (#12841) · Issues · GitLab.org / GitLab Community Edition · GitLab)。上記では username 属性をユーザ名に割り当てています。
設定が完了したらGitLabを再起動します。ログイン画面で EXAMPLE LOGIN というボタンが表示されたら成功です。
うまくいかない場合は、KeycloakやGitLabのログを確認しましょう。
Mattermostの設定
MattermostでGitLab SSOを設定します。これにより、Mattermost→GitLab→KeycloakのSSOを実現できます。
https://docs.mattermost.com/deployment/sso-gitlab.html
KeycloakのusernameがそのままGitLabやMattermostのユーザ名(@int128)になるので、ユーザ管理の設計はよく考えた方がよいと思います。もちろん、Keycloakのマッピングを変更すれば別の属性をユーザ名にできます。
Keycloakの設定を自動化する
(2018-06-22追記)Keycloakにクライアントを追加する作業をポチポチやっていると疲れるので、JSONでインポートできるようにしました。
まとめ
残念ながら、GitLabやMattermostからのSLO(シングルログアウト)は対応していないようです(Explore SAML Single Sign Out (#17344) · Issues · GitLab.org / GitLab Community Edition · GitLab)。
*1:2018-06-22:追記しました
